This guide will walk through managing an ERC20 token using Defender Admin and Gnosis Safe, specifically proposing to mint tokens and then approving this proposal.
We will be using Rinkeby public testnet.
Defender signup
If you haven’t already, sign up for Defender for free:
Create a Gnosis Safe
For this guide we will use a Gnosis Safe with two owners, requiring both to sign.
Gnosis Safe is available on the Rinkeby public testnet:
Follow the instructions on how to create a Gnosis Safe using two test accounts as owners. I am using two test metamask accounts.
You will need the address of your Gnosis Safe that you create.
I created the following Gnosis Safe.
Deploy an ERC20 token
Next up, we will deploy an ERC20 token (based on Preset ERC20)
For convenience we will deploy to Rinkeby using Remix. We could also deploy to Rinkeby using Truffle or Hardhat (see: https://docs.openzeppelin.com/learn/connecting-to-public-test-networks)
MyToken.sol
The following smart contract uses GitHub imports to extend the OpenZeppelin Contracts ERC20 implementation. To use in Truffle or Hardhat replace the imports with the equivalent from the npm package.
// SPDX-License-Identifier: MIT
// Based on https://github.com/OpenZeppelin/openzeppelin-contracts/blob/v3.2.0/contracts/presets/ERC20PresetMinterPauser.sol
pragma solidity ^0.6.0;

import "https://github.com/OpenZeppelin/openzeppelin-contracts/blob/v3.2.0/contracts/access/AccessControl.sol";
import "https://github.com/OpenZeppelin/openzeppelin-contracts/blob/v3.2.0/contracts/GSN/Context.sol";
import "https://github.com/OpenZeppelin/openzeppelin-contracts/blob/v3.2.0/contracts/token/ERC20/ERC20.sol";
import "https://github.com/OpenZeppelin/openzeppelin-contracts/blob/v3.2.0/contracts/token/ERC20/ERC20Burnable.sol";
import "https://github.com/OpenZeppelin/openzeppelin-contracts/blob/v3.2.0/contracts/token/ERC20/ERC20Pausable.sol";

contract MyToken is Context, AccessControl, ERC20Burnable, ERC20Pausable {
    bytes32 public constant MINTER_ROLE = keccak256("MINTER_ROLE");
    bytes32 public constant PAUSER_ROLE = keccak256("PAUSER_ROLE");

    /**
     * @dev Grants `DEFAULT_ADMIN_ROLE`, `MINTER_ROLE` and `PAUSER_ROLE` to the
     * account.
     *
     */
    constructor(string memory name, string memory symbol, address account) public ERC20(name, symbol) {
        _setupRole(DEFAULT_ADMIN_ROLE, account);

        _setupRole(MINTER_ROLE, account);
        _setupRole(PAUSER_ROLE, account);
    }

    /**
     * @dev Creates `amount` new tokens for `to`.
     *
     * Requirements:
     *
     * - the caller must have the `MINTER_ROLE`.
     */
    function mint(address to, uint256 amount) public virtual {
        require(hasRole(MINTER_ROLE, _msgSender()), "MyToken: must have minter role to mint");
        _mint(to, amount);
    }

    /**
     * @dev Pauses all token transfers.
     *
     * Requirements:
     *
     * - the caller must have the `PAUSER_ROLE`.
     */
    function pause() public virtual {
        require(hasRole(PAUSER_ROLE, _msgSender()), "MyToken: must have pauser role to pause");
        _pause();
    }

    /**
     * @dev Unpauses all token transfers.
     *
     * Requirements:
     *
     * - the caller must have the `PAUSER_ROLE`.
     */
    function unpause() public virtual {
        require(hasRole(PAUSER_ROLE, _msgSender()), "MyToken: must have pauser role to unpause");
        _unpause();
    }

    function _beforeTokenTransfer(address from, address to, uint256 amount) internal virtual override(ERC20, ERC20Pausable) {
        super._beforeTokenTransfer(from, to, amount);
    }
}
When we deploy we need to provide the token name, symbol and the account that will have the minter, pauser and default admin roles. We want to assign the address of our Gnosis Safe to these roles.

My contract is at the following address:
Defender Admin - Add contract
Once our ERC20 token is deployed we can then add it to Defender Admin.
Select Add contract, and set a Name, choose network: Rinkeby, add the contract address and the ABI (you can copy this from Remix compilation or if the contract is verified it will be obtained automatically).
We can then add our contract.
Mint
Now that our contract is added in Defender we can create proposals for admin actions.
Select our contract and then select New Proposal.
We can then create a new admin action for our token.
Select the mint function, add an address to receive the tokens and a token amount.
The admin account is the address of our Gnosis Safe as we gave this the minter role when we deployed the contract.
We also need to describe our proposal for other owners of the Gnosis Safe to review.
Select Create admin action when the rest of the fields are filled in.
We then need to sign using our wallet (in this case MetaMask) to approve the transaction.
Once approved, the transaction will be relayed and the proposal will be created.
Our proposal is shown with a state of 1 out of 2 approvals.
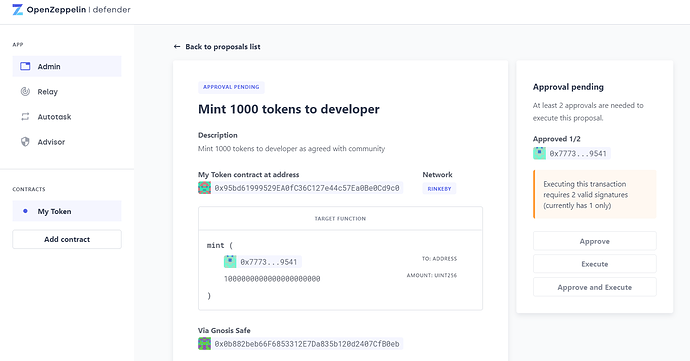
We can select our proposal to view the details of the proposal.
The proposal to mint 1000 tokens has approval pending.
We can approve (or approve and execute) the proposal using the other owner of the Gnosis Safe. This account may be controlled by us or by another team member in Defender.
We need to switch to this account so that we can approve (or this could be a team member logging in to Defender to approve with an Ethereum account they control).
We can then approve and sign the transaction.
Once approved we can execute (or we could have done this in one step using Approve and Execute). We will be asked to sign for the transaction to be relayed.
Once we have confirmation of the transaction the proposal has then been executed.
We have now minted the tokens.
Next steps
We can repeat the action of minting or propose other actions such as pause, grantRole or revokeRole.
To improve readability we can add aliases for addresses in an address book shared with our team.
Once we have set alias’s for our Gnosis Safe and our two accounts it is easier to read rather than Ethereum addresses.


