Prerequisites
This tutorial assumes you have basic knowledge of solidity, hardhat, and understand the the tutorial from here OpenZeppelin Upgrades: Step by Step Tutorial for Hardhat
This tutorial will use OZ’s Box.sol and BoxV2.sol for the upgrade with the TimeLock controlled by the Gnosis Safe MultiSig.
This tutorial requires a network API key. You can get one from Alchemy https://www.alchemyapi.io/.
This tutorial uses Rinkeby’s test network, you can get test Ether from the faucet: https://faucet.rinkeby.io/
For contract verification you will need an Etherscan API key, found in your account pages: https://etherscan.io/myapikey
The packages required are as follows:
https://www.npmjs.com/package/hardhat
https://www.npmjs.com/package/@openzeppelin/hardhat-upgrades
https://www.npmjs.com/package/@nomiclabs/hardhat-ethers
https://www.npmjs.com/package/ethers
https://www.npmjs.com/package/@nomiclabs/hardhat-etherscan
https://www.npmjs.com/package/chai
https://www.npmjs.com/package/@openzeppelin/contracts
The solidity version used is 0.8.3, but modification is expected without issue.
Make your contracts match the compiler version you prefer.
This tutorial will be very similar to the tutorial OpenZeppelin Upgrades: Step by Step Tutorial for Hardhat but we will use the TimeLock to upgrade the contract.
Step 1. Create a new npm project
Navigate to a directory you wish to create this tutorial folder in and run the commands:
mkdir TimeLockGnosisSafeTutorial && cd TimeLockGnosisSafeTutorial
then run
npm init -y
Step 2. Setup Hardhat
Run the following commands:
npm install hardhat
then run
npx hardhat
-Choose: “Create an empty hardhat.config.js” from the options given.
Step 3. Install Hardhat Upgrades, Hardhat Ethers, Ethers, and Hardhat Etherscan.
Run the following commands:
npm install @openzeppelin/hardhat-upgrades
then run
npm install @nomiclabs/hardhat-ethers
then run
npm install ethers
then run
npm install @nomiclabs/hardhat-etherscan
Step 4. Create and Configure hardhat.config.js
In the directory, TimeLockGnosisSafeTutorial, open hardhat.config.js and paste the code below.
Your hardhat.config.js may be very different depending on your preferences and network settings.
Example hardhat.config.js file:
require('@nomiclabs/hardhat-ethers');
require('@openzeppelin/hardhat-upgrades');
require("@nomiclabs/hardhat-etherscan");

const { alchemyAPIkeyRinkeby } = require('./secrets.json');
const { deployerWalletPrivateKey } = require('./secrets.json');
const { etherscanAPIkey } = require('./secrets.json');

/**
 * @type import('hardhat/config').HardhatUserConfig
 */
module.exports = {
  solidity: {
    version: "0.8.3",
    settings: {
      optimizer: {
        enabled: true,
        runs: 200
      }
    }
  },
  defaultNetwork: "hardhat",
  hardhat: {
    forking: {
      url: alchemyAPIkeyRinkeby
    }
  },
  networks: {
    TESTNETrinkeby: {
      url: alchemyAPIkeyRinkeby,
      accounts: [deployerWalletPrivateKey],
      gas: 10000000
    }
  },
  etherscan: {
    apiKey: etherscanAPIkey
  },
  paths: {
    sources: "./contracts",
    tests: "./test",
    cache: "./cache",
    artifacts: "./artifacts"
  }
};
Step 4. Create and Configure secrets.json
Create a secrets.json file to store your Deployer Wallet Private Key and API key. Paste the below code into it.
Note - Never upload or share your Deployer Wallet Private Key or API key with anyone.
I keep mine in secrets.json and be sure to exclude it from any sharing mechanism.
Do not let anyone know your Private Key.
It is highly suggested that you use an separate test wallet for your deployer.
To get your Private key, it depends on the wallet you have, you will need to find tutorials for that via google.
You can get an Alchemy API key at https://www.alchemyapi.io/
You can get an Etherscan API key at https://etherscan.io/myapikey
Example secrets.json file:
{
    "alchemyAPIkeyRinkeby": "YourAlchemyAPIkey",
    "deployerWalletPrivateKey": "YourDeployerWalletPrivateKey",
    "etherscanAPIkey": "YourEtherscanAPIkey"
}
Step 6. Create the Box.sol upgradeable contract.
In the directory TimeLockGnosisSafeTutorial create a “contracts” directory.
Create Box.sol in the “contracts” directory.
Paste the below text into the Box.sol contract.
// contracts/Box.sol
// SPDX-License-Identifier: MIT
pragma solidity ^0.8.3;

contract Box {
    uint256 private value;

    // Emitted when the stored value changes
    event ValueChanged(uint256 newValue);

    // Stores a new value in the contract
    function store(uint256 newValue) public {
        value = newValue;
        emit ValueChanged(newValue);
    }

    // Reads the last stored value
    function retrieve() public view returns (uint256) {
        return value;
    }
}
Step 7. Create tests the Contract
Install the testing package, chai with the command
npm install chai
In the directory TimeLockGnosisSafeTutorial create a “test” directory.
In the directory “test” create the file Box.js
Paste the below text into the Box.js file
// test/Box.js
// Load dependencies
const { expect } = require('chai');

let Box;
let box;

// Start test block
describe('Box', function () {
  beforeEach(async function () {
    Box = await ethers.getContractFactory("Box");
    box = await Box.deploy();
    await box.deployed();
  });

  // Test case
  it('retrieve returns a value previously stored', async function () {
    // Store a value
    await box.store(42);

    // Test if the returned value is the same one
    // Note that we need to use strings to compare the 256 bit integers
    expect((await box.retrieve()).toString()).to.equal('42');
  });
});
In the directory “test” create the file Box.proxy.js
Paste the below text into the Box.proxy.js file
// test/Box.proxy.js
// Load dependencies
const { expect } = require('chai');

let Box;
let box;

// Start test block
describe('Box (proxy)', function () {
  beforeEach(async function () {
    Box = await ethers.getContractFactory("Box");
    box = await upgrades.deployProxy(Box, [42], {initializer: 'store'});
  });

  // Test case
  it('retrieve returns a value previously initialized', async function () {
    // Test if the returned value is the same one
    // Note that we need to use strings to compare the 256 bit integers
    expect((await box.retrieve()).toString()).to.equal('42');
  });
});
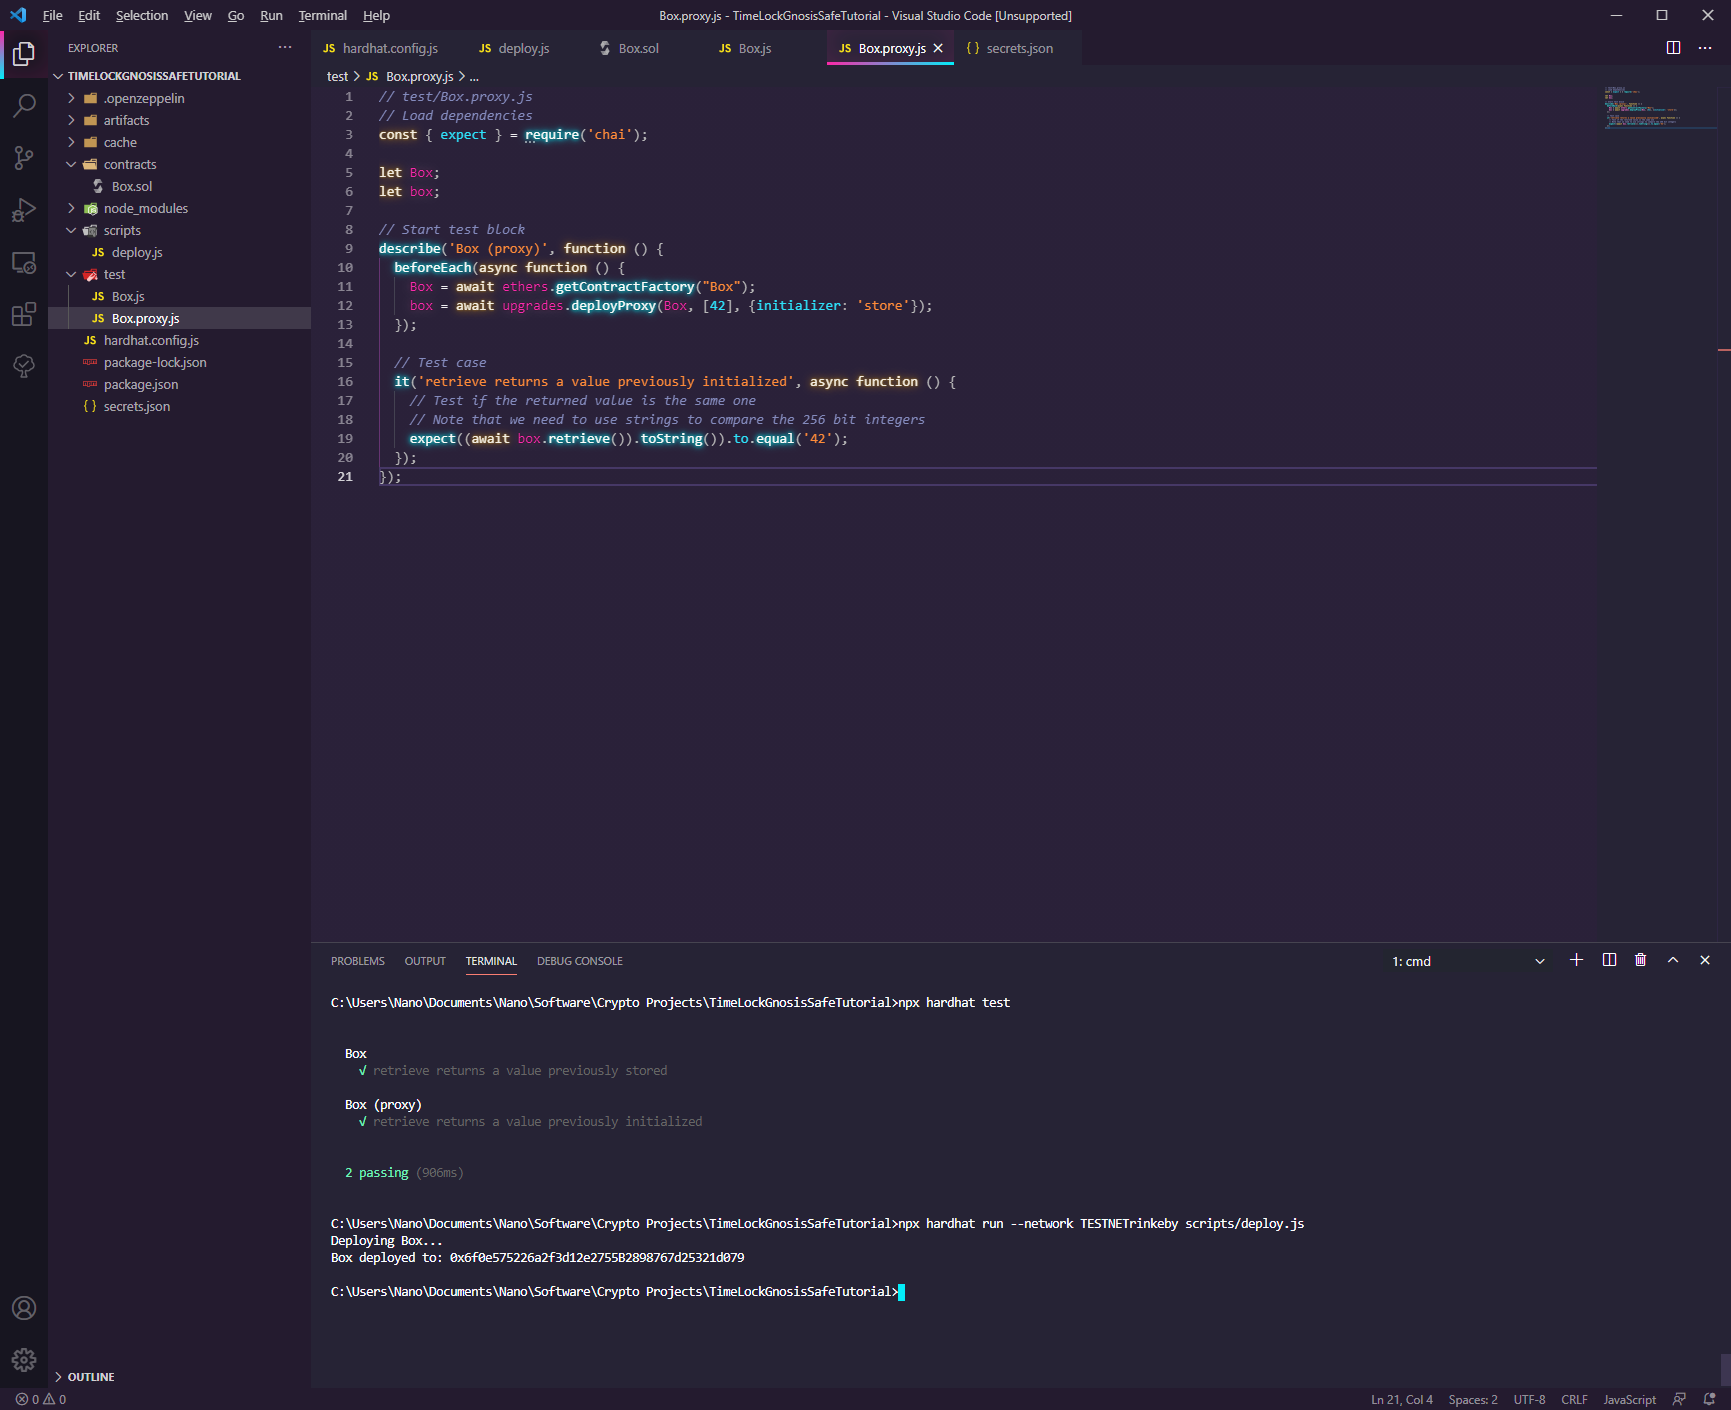
Step 8. Verify Folder and File Structure
So far, if you have been following the tutorial exactly, you should have a folder structure and files open like in the screenshot.

Step 9. Perform tests
Now test the contract with the following command
npx hardhat test
Both tests pass, as you can see from the previous screenshot.
Step 10. Prepare to Deploy the Contract to the Rinkeby Network
This step will use the Rinkeby Testnetwork. If you need test Ether, receive it from https://faucet.rinkeby.io/
In the directory “TimeLockGnosisSafeTutorial” create a “scripts” directory.
In the directory “scripts” create the file deploy.js
Paste the below code into the deploy.js file
// scripts/deploy.js
async function main() {
    const Box = await ethers.getContractFactory("Box");
    console.log("Deploying Box...");
    const box = await upgrades.deployProxy(Box, [42], { initializer: 'store' });
    console.log("Box deployed to:", box.address);
  }

  main()
    .then(() => process.exit(0))
    .catch(error => {
      console.error(error);
      process.exit(1);
    });
Step 11. Deploy the Contract to Rinkeby
Run the following command to deploy the contract.
npx hardhat run --network TESTNETrinkeby scripts/deploy.js
A message should appear saying your Box contract was deployed to an Address
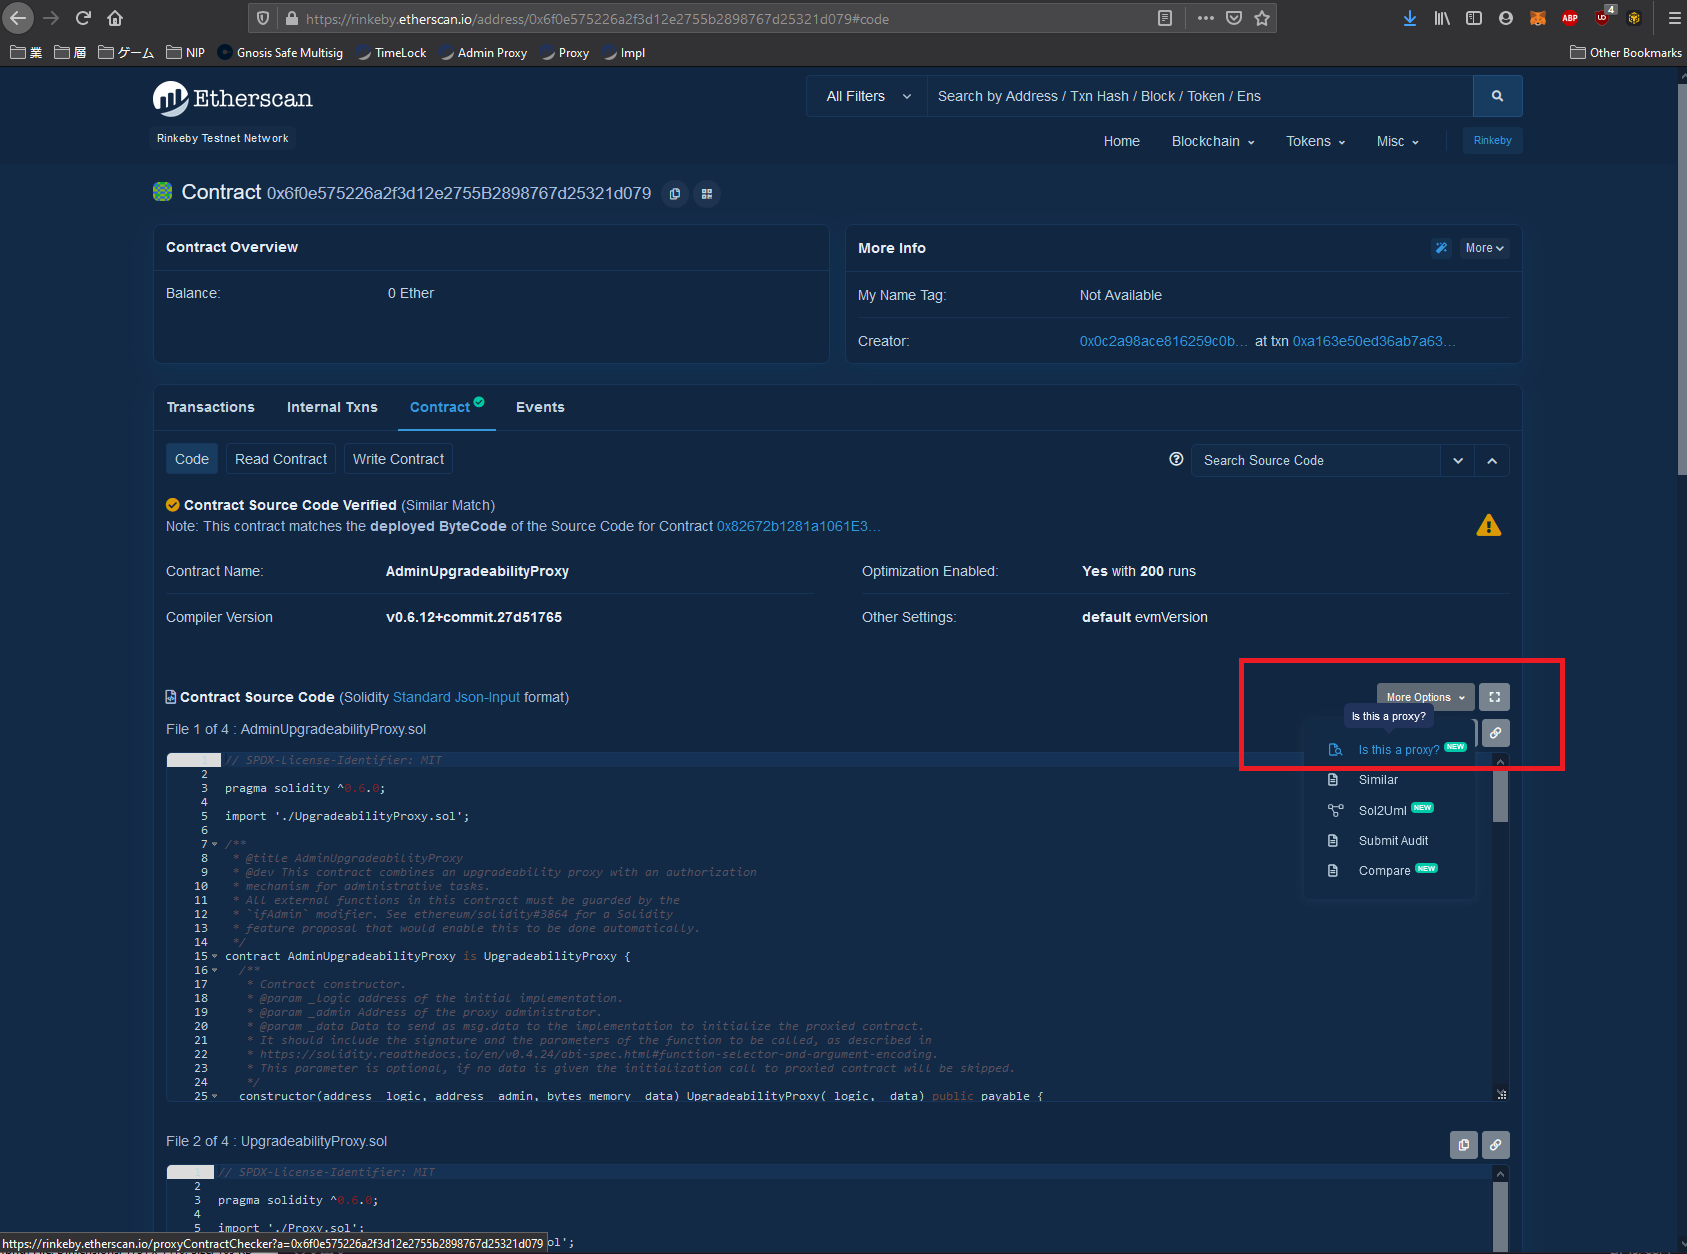
IMPORTANT - This address is the PROXY ADDRESS and you must note this down.
In this example the Proxy Address is 0x6f0e575226a2f3d12e2755b2898767d25321d079 as shown in the screenshot below.
Step 12. Verify the Contracts for your specific project.
The proxy address shown is already verified thanks to Open Zeppelin.
However we need to still verify our IMPLEMENTATION Contract Code, which is Box.sol.
Navigate to Etherscan and go to your Contract.
The example Proxy Contract is:
https://rinkeby.etherscan.io/address/0x6f0e575226a2f3d12e2755b2898767d25321d079#code
Click More Options, and click “Is this a Proxy?”
Click Verify
Now the IMPLEMENTATION ADDRESS is shown.

If you’re following the tutorial exactly, then your code will already be verified, but assuming it is not, you will need to verify it with the next steps.
Important - Copy the IMPLEMENTATION ADDRESS down.
In this example my implementation is
https://rinkeby.etherscan.io/address/0x911d1859193173b310f651e0c823b13215fbc50e
Back in your IDE or Compiler run the following verify command
npx hardhat verify --network TESTNETrinkeby PROXYADDRESS
For this tutorial’s Proxy Address the example command is
npx hardhat verify --network TESTNETrinkeby 0x911d1859193173b310f651e0c823b13215fbc50e
The message will say "successfully verified contract Box on Etherscan."
You can then navigate to your Implementation Contract
https://rinkeby.etherscan.io/address/0x911d1859193173b310f651e0c823b13215fbc50e#code
And view its code.
Step 13. Create the Gnosis Safe Multisig
A multisig is a wallet that is shared between a group of other individuals.
To do any transaction, it requires multiple signatures from the individuals.
In this example, we will only have 1 individual, but in real use cases you will have your team on the gnosis safe.
Be sure to have a MetaMask, or other compatible wallet, for use with Gnosis before progressing.
Set your network to Rinkeby.
Navigate to
https://rinkeby.gnosis-safe.io/app/#/welcome
Follow the Steps:
- Connect Wallet
- Create New Safe
- Name your Safe
- Confirm Owners
- Set number of confirmations required.
- Review
- Submit
- Confirm
- Get Started
It should look like this screen after setup of the safe is complete.

Important - Copy down your Gnosis Safe Address
In this example it is 0x2106fD5d58B76Cd56480eCE1dC5f864a4914a021
Step 14. Create the TimeLock Contract
Back in your IDE, use the command
npm install @openzeppelin/contracts
This tutorial will use Open Zeppelin’s TimeLock Contract as a base.
which can be found in your node_modules folder under
TimeLockGnosisSafeTutorial\node_modules\@openzeppelin\contracts\governance\TimelockController.sol
Copy and paste this file into the “contracts” folder.
Open the file and modify
pragma solidity ^0.8.0;
to
pragma solidity ^0.8.3;
modify
import "../access/AccessControl.sol";
to
import "@openzeppelin/contracts/access/AccessControl.sol";
Step 15. Create the TimeLock Deploy script
In the “scripts” folder, create deploy-timelock.js
and paste the below code into the file.
// deployer for timelock

const argumentsArray = require('../arguments.js');

async function main() {

    var delayTime = argumentsArray[0];
    var proposersArray = argumentsArray[1];
    var executorsArray = argumentsArray[2];

    const [deployer] = await ethers.getSigners();

    console.log(
      "Deploying contracts with the account:",
      deployer.address
    );

    console.log("Account balance:", (await deployer.getBalance()).toString());

    const Token = await ethers.getContractFactory("TimelockController");

    const token = await Token.deploy(delayTime, proposersArray, executorsArray);

    console.log("Timelock address:", token.address);

  }

  main()
    .then(() => process.exit(0))
    .catch(error => {
      console.error(error);
      process.exit(1);
    });
Step 16. Create the arguments file for our TimeLock deployer.
Now create a file arguments.js in the TimeLockGnosisSafeTutorial folder.
In that paste the following code
module.exports = [
  150,    // minimum delay timer in seconds
  ['0x2106fD5d58B76Cd56480eCE1dC5f864a4914a021'],   // Proposers Array
  ['0x2106fD5d58B76Cd56480eCE1dC5f864a4914a021']    // Executors Array
];
You will need to modify “0x2106fD5d58B76Cd56480eCE1dC5f864a4914a021” to be your Gnosis Safe Address.
These are the arguments used when deploying the TimeLock.
For this example I have set the minimum delay timer to 150, which is 2.5 minutes
The Proposers and the Executors for our TimeLock are both set to the Gnosis Safe’s address.
These parameters are in Array form, meaning you can set multiple Proposers and Executors,
but for this example, because we are using a MultiSig, we will use only the MultiSig to pass our transactions through.
Step 17. Understand what the TimeLock does with the Gnosis Multisig Safe
Open the TimelockController.sol file
It has roles, which are addresses that can do certain actions.
The proposers are allowed to schedule transactions.
The executors are allowed to execute transactions.
These are both set to the Gnosis Safe Address in the arguments.js file.
The two primary functions we need to understand is the schedule and the execute functions.
These two functions will be called by our Gnosis Multisig.
In order to have our TimeLock Execute Transactions, they first must be Scheduled with the schedule function.
After the delay time elapses, then you can call the execution function toExecute the transaction.
Both the schedule and the execute function have the same arguments, except that execute does not have the delay argument.
Below is a short explanation of each argument in the
target - Address of the contract you want to execute the transaction on.
value - a value that can be assigned with this, normally it will be 0.
data - this is the data of a transaction
predecessor - if this transaction relies on one before it, you will put it’s Operation ID here. Each Operation performed by the TimeLock has an ID attached to it. This can be used in conjunction with the predecessor argument. If you do not have a predecessor use 0x0000000000000000000000000000000000000000000000000000000000000000
salt - this is a password that you can use when scheduling transactions, and must be input during the execution function to actually execute the function. This could be useful if you were sharing a TimeLock with many different people or had many users, and wanted to safeguard your transactions from being executed by other individuals. In this example there is TimeLock for one team of users, so the salt is set to 0x0000000000000000000000000000000000000000000000000000000000000000.
delay - this is the delay you would like. It must be equal to or greater than the minimum delay. In this example it was set to 150 seconds. You have the option to make the delay longer.
Whenever you schedule a transaction, it generates an ID associated with the operation. Later on in the example, you will see how to obtain this ID from the schedule transaction and how to get information about it.
There is also a cancel function, which you can use to cancel an operation with it’s ID.
If you would like to change your minimum delay, you can use the updateDelay function.
Note that in order to use this, you must call it with the TimeLock itself.
Step 18. Optional Testing
You may wish to develop some tests to experiment with the TimeLock function before deploying.
As this code is not modified and is from Open Zeppelin, it will not be tested because it is expected work as is.
Step 19. Deploy and Verify the TimeLock.
Run
npx hardhat run --network TESTNETrinkeby scripts/deploy-timelock.js
Important - Note down the TimeLock’s address
In the example it is 0xa0ea1e6Bea3BE3f9565E557AB6Aefe22D1e0e74e
Now verify using the following command
npx hardhat verify --network TESTNETrinkeby --constructor-args arguments.js 0xa0ea1e6Bea3BE3f9565E557AB6Aefe22D1e0e74e
Notice that we have to include the arguments.js file
Otherwise the verification will not know what arguments we used when deploying.
Navigate to the Address in Etherscan to verify that it was verified.
https://rinkeby.etherscan.io/address/0xa0ea1e6Bea3BE3f9565E557AB6Aefe22D1e0e74e#code
Step 20. Transfer Ownership of the Proxy Admin (Administrator of the Proxy, not the actual Proxy) to the TimeLock.
In order to upgrade the contract, Box.sol to BoxV2.sol, we use the Proxy Administrator to upgrade.
Upon creation, the owner of the Proxy Administrator is the deployer.
To find the Proxy Admin address, you can look in rinkeby.json in the .oppenzeppelin folder. At the bottom of the file is
"admin": {
	"address": "0x697492C144FfE1Fd32dcc9CC47005A968a94694B",
	"txHash": "0xbfccfa1d79a55fbdb8eb28fb7cc2143760f6263020ca121f3d00716f1a46534d"
}
Important - Note the Proxy Admin Address down.
Inside the scripts folder, create the file “transfer_ownership.js” and copy the below code into it.
async function main() {

 const newOwnerOfTheProxyAdmin = '0xa0ea1e6Bea3BE3f9565E557AB6Aefe22D1e0e74e';   // this will be the address of the TimeLock, as we need it to be the owner of the Proxy Admin.

 console.log("Transferring ownership of ProxyAdmin...");       // The owner of the ProxyAdmin can upgrade our contracts
 await upgrades.admin.transferProxyAdminOwnership(newOwnerOfTheProxyAdmin);
 console.log("Transferred ownership of ProxyAdmin to:", newOwnerOfTheProxyAdmin);

 }

main()
 .then(() => process.exit(0))
 .catch(error => {
   console.error(error);
   process.exit(1);
 });
You will need to modify 0xa0ea1e6Bea3BE3f9565E557AB6Aefe22D1e0e74e to be your TimeLock address
Now run
npx hardhat run --network TESTNETrinkeby scripts/transfer_ownership.js
to transfer ownership to the TimeLock.
Step 21. Prepare BoxV2.sol for the Upgrade
Create BoxV2.sol in the contracts folder and paste the following code
// contracts/BoxV2.sol
// SPDX-License-Identifier: MIT
pragma solidity ^0.8.3;

contract BoxV2 {
    uint256 private value;

    // Emitted when the stored value changes
    event ValueChanged(uint256 newValue);

    // Stores a new value in the contract
    function store(uint256 newValue) public {
        value = newValue;
        emit ValueChanged(newValue);
    }

    // Reads the last stored value
    function retrieve() public view returns (uint256) {
        return value;
    }

    // Increments the stored value by 1
    function increment() public {
        value = value + 1;
        emit ValueChanged(value);
    }
}
Step 22. Create BoxV2 Tests for Contract and Proxy
Create BoxV2.js in the test folder and copy the below code into it.
// test/BoxV2.js
// Load dependencies
const { expect } = require('chai');

let BoxV2;
let boxV2;

// Start test block
describe('BoxV2', function () {
  beforeEach(async function () {
    BoxV2 = await ethers.getContractFactory("BoxV2");
    boxV2 = await BoxV2.deploy();
    await boxV2.deployed();
  });

  // Test case
  it('retrieve returns a value previously stored', async function () {
    // Store a value
    await boxV2.store(42);

    // Test if the returned value is the same one
    // Note that we need to use strings to compare the 256 bit integers
    expect((await boxV2.retrieve()).toString()).to.equal('42');
  });

  // Test case
  it('retrieve returns a value previously incremented', async function () {
    // Increment
    await boxV2.increment();

    // Test if the returned value is the same one
    // Note that we need to use strings to compare the 256 bit integers
    expect((await boxV2.retrieve()).toString()).to.equal('1');
  });
});
Create BoxV2.proxy.js in the test folder and copy the below code into it.
// test/BoxV2.proxy.js
// Load dependencies
const { expect } = require('chai');

let Box;
let BoxV2;
let box;
let boxV2;

// Start test block
describe('BoxV2 (proxy)', function () {
  beforeEach(async function () {
    Box = await ethers.getContractFactory("Box");
    BoxV2 = await ethers.getContractFactory("BoxV2");

    box = await upgrades.deployProxy(Box, [42], {initializer: 'store'});
    boxV2 = await upgrades.upgradeProxy(box.address, BoxV2);
  });

  // Test case
  it('retrieve returns a value previously incremented', async function () {
    // Increment
    await boxV2.increment();

    // Test if the returned value is the same one
    // Note that we need to use strings to compare the 256 bit integers
    expect((await boxV2.retrieve()).toString()).to.equal('43');
  });
});
Step 23. Run the tests and verify that all pass
Run
npx hardhat test
You should see a message that indicates all of them pass, including the upgrade of the Box to BoxV2.
Consult the screenshot below for how it should look.

Step 24. Prepare the new upgrade
Inside the scripts folder, create the file “prepare_upgrade.js” and copy the below code into it.
// scripts/prepare_upgrade.js
async function main() {
  const proxyAddress = '0x6f0e575226a2f3d12e2755B2898767d25321d079';    // This is the proxy address NOT the admin of the proxy.

  const BoxV2 = await ethers.getContractFactory("BoxV2");
  console.log("Preparing upgrade...");
  const boxV2Address = await upgrades.prepareUpgrade(proxyAddress, BoxV2);
  console.log("BoxV2 at:", boxV2Address);
}

main()
  .then(() => process.exit(0))
  .catch(error => {
    console.error(error);
    process.exit(1);
  });
You will need to change 0x6f0e575226a2f3d12e2755B2898767d25321d079 to your proxy address.
Note that it is the Proxy Address, not the Administrator of the Proxy (Proxy Admin).
Run
npx hardhat run --network TESTNETrinkeby scripts/prepare_upgrade.js
Copy down the new Implementation Address, in this example it will be 0xbe0b67cf6301E9B061b34FFae02D45ed671A7475
Now run
npx hardhat verify --network TESTNETrinkeby 0xbe0b67cf6301E9B061b34FFae02D45ed671A7475
To verify the new Implementation Contract.
Step 25. Optional… Another way to Get the Proxy Admin Address
As stated in an earlier step…
The easiest way to find the Proxy Admin address is to look in look in rinkeby.json in the .oppenzeppelin folder. At the bottom of the file is
"admin": {
	"address": "0x697492C144FfE1Fd32dcc9CC47005A968a94694B",
	"txHash": "0xbfccfa1d79a55fbdb8eb28fb7cc2143760f6263020ca121f3d00716f1a46534d"
}
Note the Address down.
You can also find the Proxy Admin address by going to the Proxy Address, and finding the Contract Creation Transaction.
For this example the Contract Creation Transaction was
https://rinkeby.etherscan.io/tx/0xa163e50ed36ab7a63e0b55b32d47bc9d1bbbc41d469cee1dd962a3da8e64d1bd
After going to that transaction, click the State tab.
In the 3rd State, click the drop down arrow to see 3 Storage addresses.
The last storage address is the Proxy Administrator. You will need to change this number from hex to Address.
Consult the screenshot below for guidance.

At one point in time you could find the Administrator of the Proxy’s address via the Proxy’s read functions. But in the newer version this is not available.
Step 26. Get the data for the Upgrade Transaction
Go to the Proxy Admin’s page in Etherscan.
For this example the page is
https://rinkeby.etherscan.io/address/0x697492C144FfE1Fd32dcc9CC47005A968a94694B#code
Click Write Contract
Connect to Web3
Select function 4, upgrade
proxy (address) = The Proxy Address, for this example it is 0x6f0e575226a2f3d12e2755B2898767d25321d079
implementation (address) = The New Implementation Address, for this example it is 0xbe0b67cf6301E9B061b34FFae02D45ed671A7475
Refer to the screenshot below for guidance.

Click write, but DO NOT confirm.
In the MetaMask tab, click Data.
Find the Hex Data field, and copy down the Hex Data.
Refer to the screenshot below for how it should look.

For this example it is…
0x99a88ec40000000000000000000000006f0e575226a2f3d12e2755b2898767d25321d079000000000000000000000000be0b67cf6301e9b061b34ffae02d45ed671a7475
Cancel the transaction
Step 27. Schedule the Transaction to Upgrade the Contract with the Gnosis Safe using the TimeLock.
Go to your safe in the Gnosis app
https://rinkeby.gnosis-safe.io/app/#/safes/
Click New Transaction
Contract Interaction
In the “Contract Address” field, paste your TimeLock address
For this example it is 0xa0ea1e6Bea3BE3f9565E557AB6Aefe22D1e0e74e
The ABI field will autopopulate.
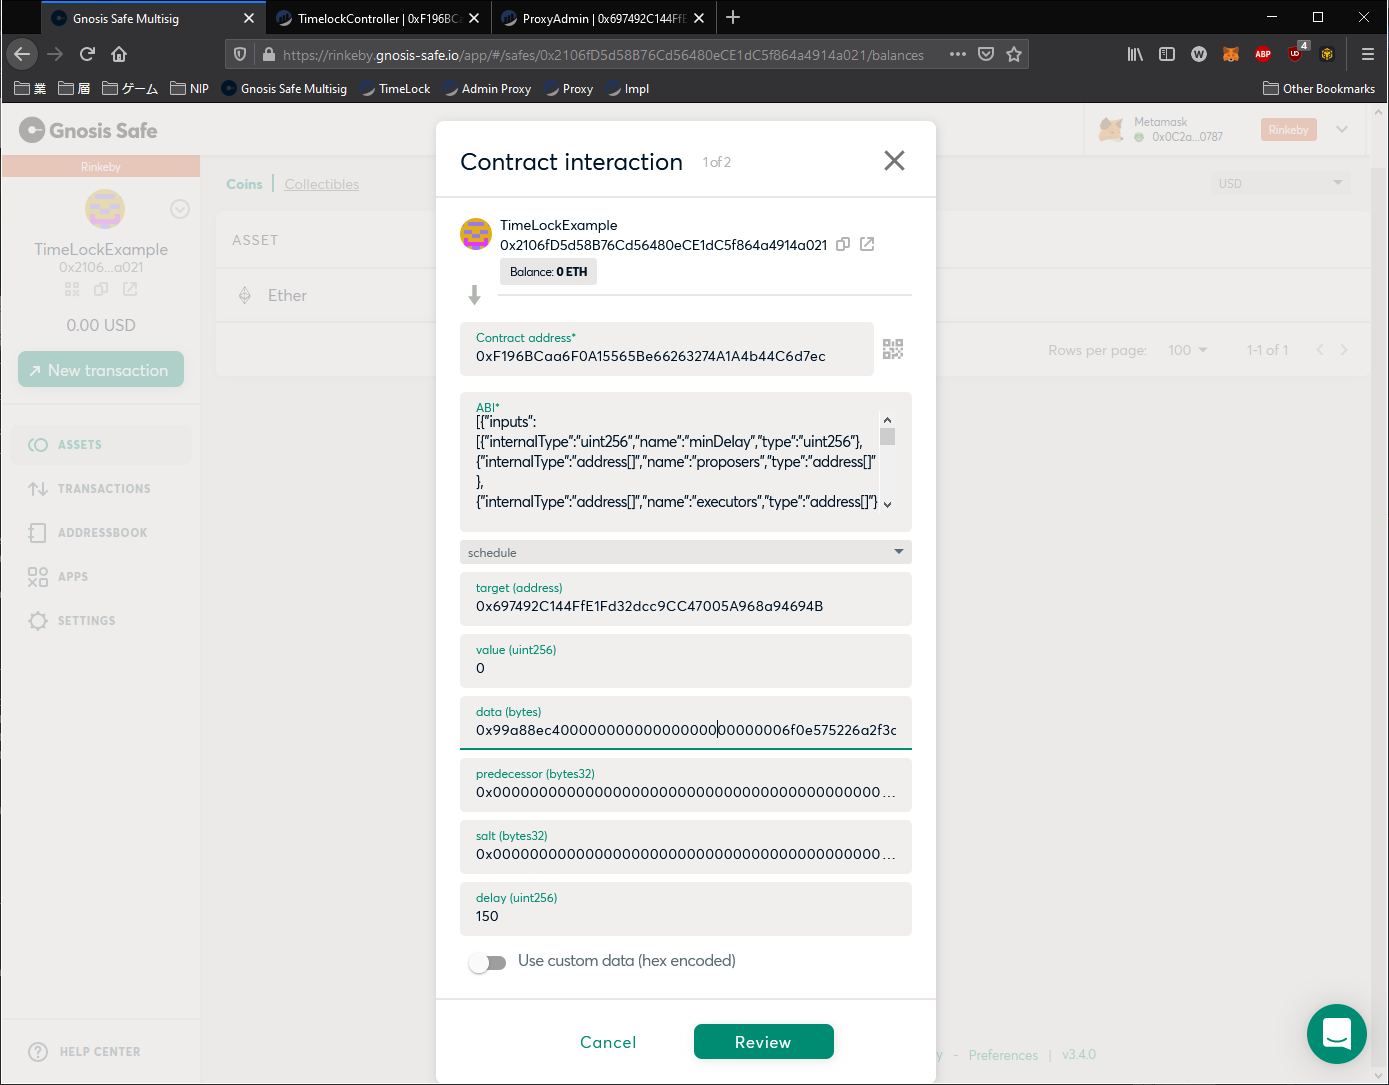
From the Method dropdown box below, select “schedule”
Fill out the fields as shown below
target (address) = Proxy Admin Address (0x697492C144FfE1Fd32dcc9CC47005A968a94694B)
value (uint256) = 0
data (bytes) = The data for the Upgrade Transaction (0x99a88ec40000000000000000000000006f0e575226a2f3d12e2755b2898767d25321d079000000000000000000000000be0b67cf6301e9b061b34ffae02d45ed671a7475)
predecessor (bytes32) = 0x0000000000000000000000000000000000000000000000000000000000000000
salt (bytes32) = 0x0000000000000000000000000000000000000000000000000000000000000000
delay (uint256) = 150
Refer to the Screenshot below for how this should look.
For explanations on each field, please refer back to the TimeLock section as these are TimeLock functions.
Click Review
If you have done something incorrectly, it will warn you, back up and fix the error by reviewing the steps. It is likely the data.
Click Submit
Click Confirm in MetaMask.
Step 28. Verify that the transaction was scheduled in the TimeLock
While waiting 2.5 Minutes for the transaction to go through the TimeLock, go to the TimeLock’s address in etherscan.
Click the Events tab.
The most recent transaction is the “CallScheduled” one.
In that transaction log you can investigate the data passed into the CallScheduled function.
In [topic1] is the ID of the operation.
You can use this Operation ID in order to cancel a scheduled transaction.
You can use this Operation ID in the Predecessor field of Schedule/Execute functions.
See the screenshot below displaying this transaction.

Step 29. Execute the Transaction to Upgrade the Contract with the Gnosis Safe using the TimeLock.
Make sure your delay timer has passed, in this example it was 2.5 minutes.
Go to your safe in the Gnosis app
https://rinkeby.gnosis-safe.io/app/#/safes/
Click New Transaction
Contract Interaction
In the “Contract Address” field, paste your TimeLock address
For this example it is 0xa0ea1e6Bea3BE3f9565E557AB6Aefe22D1e0e74e
The ABI field will autopopulate.
From the Method dropdown box below, select “execute”
Fill out the fields as shown below
Value (ether) = 0
target (address) = Proxy Admin Address (0x697492C144FfE1Fd32dcc9CC47005A968a94694B)
value (uint256) = 0
data (bytes) = The data for the Upgrade Transaction (0x99a88ec40000000000000000000000006f0e575226a2f3d12e2755b2898767d25321d079000000000000000000000000be0b67cf6301e9b061b34ffae02d45ed671a7475)
predecessor (bytes32) = 0x0000000000000000000000000000000000000000000000000000000000000000
salt (bytes32) = 0x0000000000000000000000000000000000000000000000000000000000000000
Click Review
If you have done something incorrectly, it will warn you, back up and fix the error by reviewing the steps. It is likely the data.
Click Submit
Click Confirm in MetaMask.
Step 30. Verify that the New Implementation contract is in place.
Navigate to your Proxy Address in Etherscan. (0x6f0e575226a2f3d12e2755B2898767d25321d079 for this example).
Click Read as Proxy.
A message should show saying " ABI for the implementation contract at 0xbe0b67cf6301e9b061b34ffae02d45ed671a7475, using the EIP-1967 Transparent Proxy pattern.
Previously recorded to be on 0x911d1859193173b310f651e0c823b13215fbc50e."
Verify that the Implementation Address is the one that was created when you ran the prepare)upgrade.js script.
Refer to the below screenshot for guidance.

After This…
After getting your Proxy, TimeLock, and Gnosis Multisg in place, it’s time to celebreate with your team that you now have a way to safeguard your project.
You can fix and upgrade the contract using the Proxy.
You can stop a single dev rugpulling by using the Gnosis Multisg.
You can gain customer confidence by using a TimeLock.